

How to Proof Candle Packaging Before Production
Long before a customer lights the wick, your candle box tells a story—of luxury, sustainability, and trust. Yet, too often, many brands rush into production without properly proofing their packaging, leading to costly mistakes, wasted inventory, and damaged reputations. Proofing is not just a technical step. It is a strategic way to ensure your packaging is protective, compliant, and aligned with your brand identity.
But how to proof candle packaging before production?
Let’s explore every stage of candle packaging proofing, from digital artwork checks to physical fit tests, and best practices.
Step 1: Approve Different Sample Types
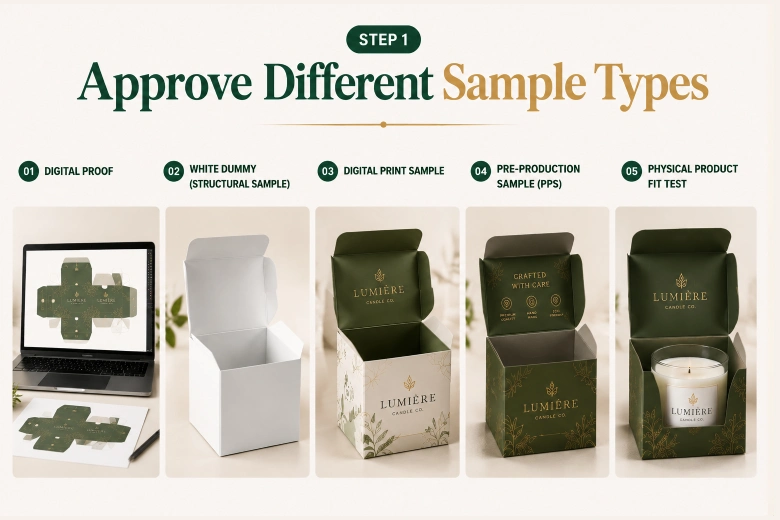
Samples are your safety net. They allow you to catch errors before they multiply across thousands of units. By approving multiple sample types, you gain confidence that both the design and the structure of your candle boxes will perform well.
Make sure you review different sample types before approving the start of your candle box design.
Digital Proof
Digital proofs (3D mockups) are the first line of defense. They confirm your artwork placement, dieline accuracy, bleed, and barcode readability. This is the stage where you catch typos, misaligned logo, or incorrect sizing.
While digital proofs are quick and inexpensive, they don’t actually reveal how the material behaves physically.
White Dummy (Structural Sample)
A white dummy is a blank, unprinted sample that shows your candle box’s size, dimensions, folding, and insert fit.
It is essential for checking whether the candle fits snugly and whether the box can withstand handling. This step prevents disasters like candles rattling inside or boxes collapsing under weight.
Digital Print Sample
Digital print samples provide a preview of how the design looks when printed. They are useful for reviewing layout and general color tones, although they may not perfectly match final production colors.
Compare offset and digital printing techniques and choose the one that best fits your branding vibe.
Pre‑Production Sample (PPS)
The PPS is the closest representation of the final product. It includes actual materials, finishes, and assembly. Approving a PPS ensures durability, print quality, and overall presentation. While it requires more time and cost, it’s the most reliable safeguard.
Physical Product Fit Test
Finally, it’s time to place your actual candle inside the packaging. This confirms cavity size, movement, and protection. Inserts should prevent breakage, and closures should remain secure. Without this step, you risk producing boxes that don’t fit your candles.
Comparison Table: Proofing Methods
| Proof Type | Confirms | Limitations |
| Digital Proof | Artwork, dieline, text, barcodes | No material/fit confirmation |
| White Dummy | Structure, folding, insert fit | No print/finish accuracy |
| Digital Print Sample | General print look | Colors/finishes may differ |
| Pre‑Production Sample | Material, finish, assembly | Higher cost, longer lead time |
| Physical Fit Test | Candle fit, movement, protection | Requires actual product |
Step 2: Run a Quality Control Checklist
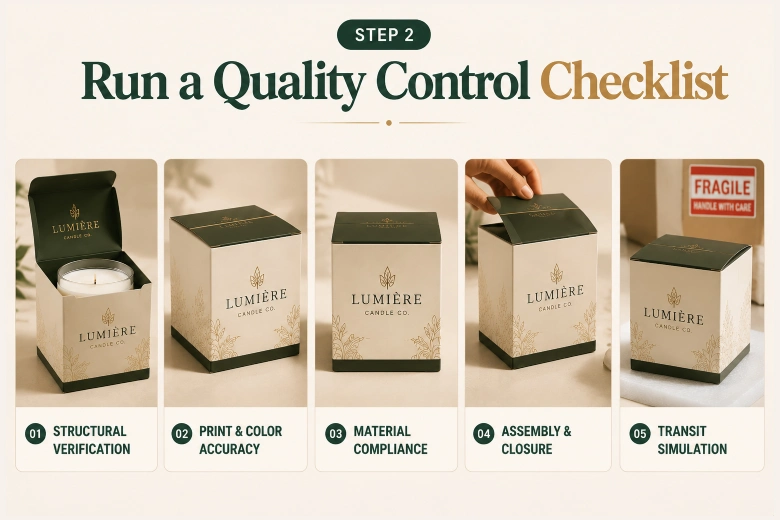
Samples alone aren’t enough. You need a systematic way to evaluate them. That’s where a quality control checklist comes in. A checklist transforms subjective impressions into measurable standards, ensuring consistency across every batch. By running structural, print, material, and transit checks, you eliminate all the guesswork.
What is included in the quality-control checklist for proofing candle packaging?
Structural Verification
Check board thickness, folding accuracy, and insert stability. Whether you need a small votive candle box or a large pillar candle box, it should not collapse under weight or fail to close properly.
Print & Color Accuracy
Verify color matching, barcode readability, and surface-finish placement. Make sure every detail maintains your brand consistency.
Material Compliance
Confirm that boards, inks, and coatings meet safety standards. Whether you choose cardboard candle boxes or rigid candle boxes, the best candle box materials must withstand heat and avoid flammable finishes.
Assembly & Closure
Test gluing strength on magnetic flaps on a magnetic closure box or the lids of a two-piece candle box.
Remember that your candle packaging should open smoothly but remain secure to deliver a memorable unboxing experience that builds loyalty.
Transit Simulation
Conduct drop and vibration tests to ensure packaging survives shipping. This stage is essential for candle shipping boxes or subscription boxes. For sure, you must prevent damage during distribution to protect your brand reputation.
Step 3: Avoid Common Mistakes
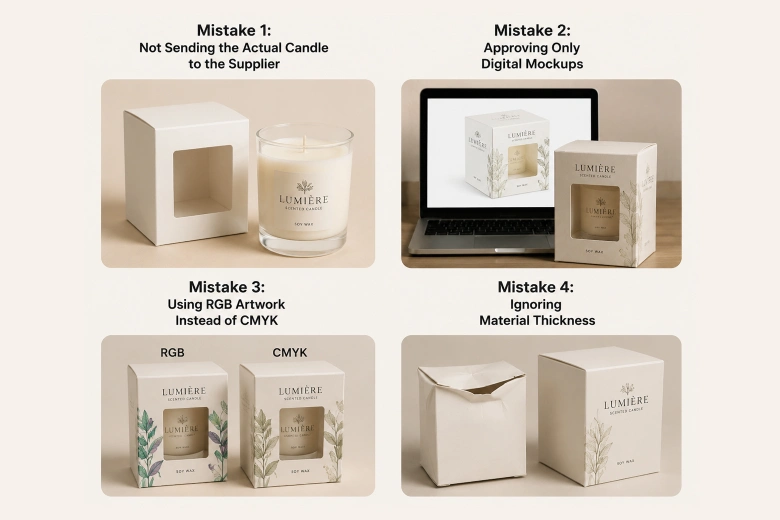
Even seasoned candle brands make avoidable mistakes when proofing packaging. These errors often stem from rushing the process or assuming digital previews are enough. By learning from common mistakes, you can sidestep costly missteps and maintain your brand’s premium positioning.
What are the mistakes to avoid?
- Mistake 1: Not Sending the Actual Candle to the Supplier
Without seeing or holding your candle, suppliers guess dimensions, leading to poor fit and wasted inserts.
- Mistake 2: Approving Only Digital Mockups
Digital previews ignore real‑world material behavior. A candle box that looks perfect on screen may fail structurally.
- Mistake 3: Using RGB Artwork Instead of CMYK
Keep in mind that RGB colors don’t translate accurately to print, which can cause mismatches. Always design in CMYK when designing candle packaging that sells.
- Mistake 4: Ignoring Material Thickness
Thin boards sag or collapse, undermining the premium feel of candle packaging. Make sure you compare kraft, rigid, and corrugated when choosing the ideal box material.
Risks if You Skip Proofing
Skipping proofing may save time upfront, but the risks far outweigh the benefits. From financial losses to brand damage, the consequences can be devastating. Proofing your candle packaging is an investment in quality, safety, and reputation.
Here are the risks you might face when you skip proofing.
- Financial Loss
The wrong board thickness or poor fit can render thousands of candle boxes useless, draining your budget.
- Brand Damage
Misaligned artwork or flimsy packaging undermines premium candle positioning. Remember, your candle packaging affects sales, and customers perceive poor packaging as poor product quality.
- Safety Issues
Non‑compliant materials and candle labels may fail under heat or transit stress. The result? They can create liability risks for your business.
Best Practice: Do the Layered Proofing
The most effective strategy is layered proofing. This means approving multiple sample types at different stages. This approach minimizes risk by catching errors early and confirming final quality before mass production.
What should you do here?
- Approve one digital proof for artwork accuracy.
- Approve one structural dummy for fit and folding.
- Approve one pre‑production sample with the actual candle inside for final confirmation.
This layered process ensures packaging is protective, compliant, and brand‑consistent.
Final Thoughts
Without any doubt, proofing candle packaging before production is not a luxury—it’s a necessity. Each stage, from digital proofs to pre‑production samples, safeguards your investment and protects your brand.
By layering proofs, running QC checklists, and avoiding common mistakes, you create packaging that is both protective and persuasive.
Overall, in the candle industry, where presentation is as important as fragrance, packaging proofing is the difference between a forgettable product and a memorable brand experience.
FAQs
Why should we approve different samples before candle packaging production?
By approving multiple sample types, you gain confidence that both the design and the structure of your candle boxes will perform well.
What is a 3D mockup of candle packaging?
A 3D mockup is a digital proof that confirms your artwork placement, dieline accuracy, bleed, and barcode readability.
What is included in the quality-control checklist for proofing candle packaging?
For the quality control checklist, you should check structural verification, print & color accuracy, material compliance, assembly & closure, and transit simulation.
What happens if we skip proofing?
Skipping proofing leads to financial loss, brand damage, and safety issues.

Get Free Quote
Latest Posts
-
 September 3, 2026
Rigid Candle Boxes vs Folding Cartons: Which Packaging Should You Choose? -
 September 1, 2026
Custom Candle Boxes vs Stock Candle Boxes: Which Is Better? -
 August 14, 2026
What is the Minimum Order Quantity for Candle Boxes? -
 August 12, 2026
How Long Does Custom Candle Box Production Take? -
 August 4, 2026
Candle Box Inserts: Foam, Cardboard, Tissue Options – Know the Internal Support