
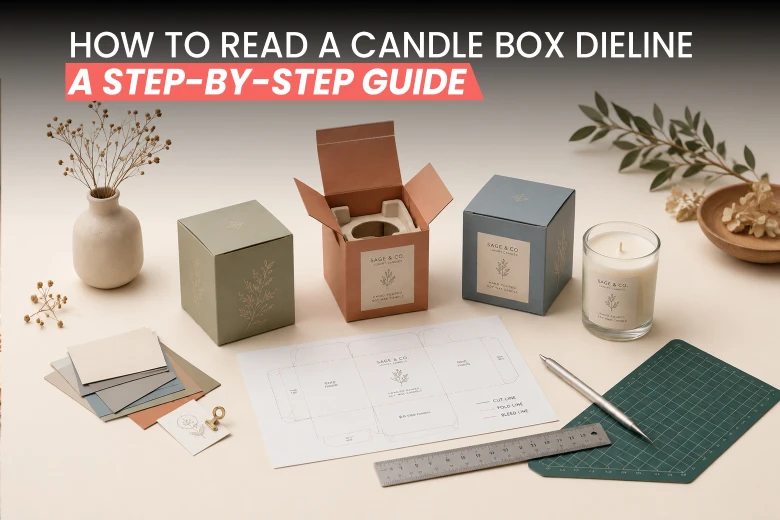
How to Read a Candle Box Dieline: A Step-by-Step Guide
- How to Read a Candle Box Dieline: A Step-by-Step Guide
- What is a Dieline?
- What’s Inside a Dieline?
- How to Read a Dieline for Candle Packaging? Step-by-Step
- The Importance of the “Safe Zone” in a Dieline
- Bleed: Ensure Your Artwork Extends Beyond the Cut Line
- Different Dieline Characteristics for Different Candle Boxes
- Why Dielines Matter for Candle Packaging?
- In Summary
- FAQs
Custom candle packaging design is fun to make. However, turning a flat 2D design into a 3D package requires precision.
Before we get to printing, every packaging project starts with a technical blueprint. We call this a dieline, and in this blog post, we will explain how to read a dieline for a candle box.
What is a Dieline?
A dieline is a flat (2D) technical template that shows all cut-outs, folds, creases, bleed, and safe areas of product packaging.
Yes, a dieline is the blueprint for packaging. It’s a 2D drawing that contains all the elements needed. In other words, it is the architecture of your candle packaging. It allows you to view your design before it is produced.
What’s Inside a Dieline?
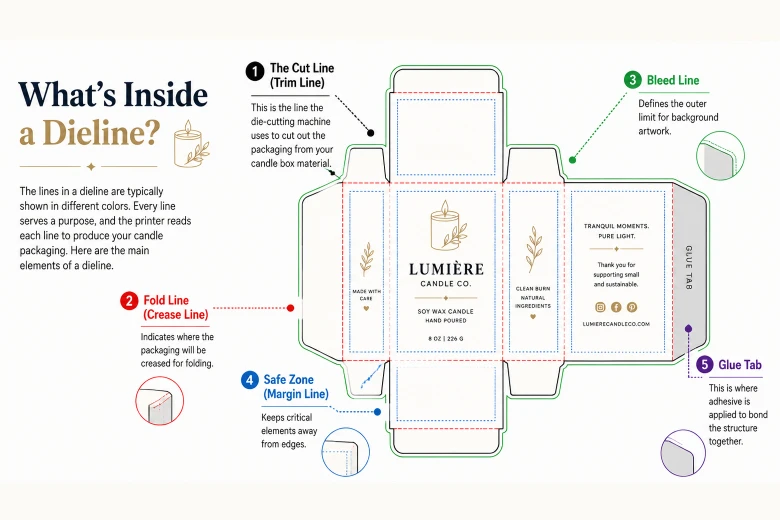
The lines in a dieline are typically shown in different colors. Every line serves a purpose, and the printer reads each line to produce your candle packaging.
Here are the main elements of a dieline.
- The Cut Line (Trim Line): Represented by a solid black line. This is the line the die-cutting machine uses to cut out the packaging from your candle box material.
- Fold Line (Crease Line): A solid red line or a series of dashes that indicates where the packaging will be creased for folding.
- Bleed Line: Usually a solid green line. It defines the outer limit for background artwork.
- Safe Zone (Margin Line): Often a dotted or solid blue line. It keeps critical elements away from edges.
- Glue Tab: A designated shaded area. This is where adhesive is applied to bond the structure together.
How to Read a Dieline for Candle Packaging? Step-by-Step
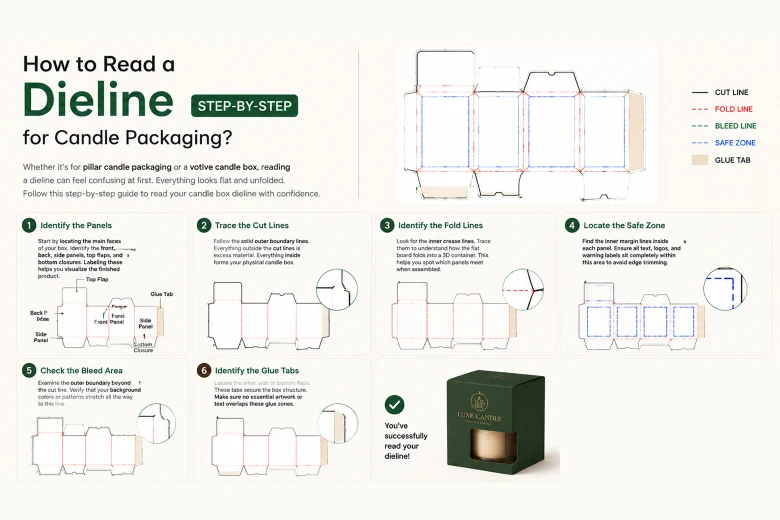
Whether it’s for pillar candle packaging or a votive candle box, reading a dieline can feel confusing at first. Everything looks flat and unfolded.
Follow this step-by-step guide to read your candle box dieline with confidence.
Step 1: Identify the Panels
Start by locating the main faces of your box. Identify the front, back, side panels, top flaps, and bottom closures. Labeling these helps you visualize the finished product.
Step 2: Trace the Cut Lines
Follow the solid outer boundary lines. Everything outside the cut lines is excess material. Everything inside forms your physical candle box.
Step 3: Identify the Fold Lines
Look for the inner crease lines. Trace them to understand how the flat board folds into a 3D container. This helps you spot which panels meet when assembled.
Step 4: Locate the Safe Zone
Find the inner margin lines inside each panel. Ensure all text, logos, and warning labels sit completely within this area to avoid edge trimming.
Step 5: Check the Bleed Area
Examine the outer boundary beyond the cut line. Verify that your background colors or patterns stretch all the way to this line.
Step 6: Identify the Glue Tabs
Locate the small side or bottom flaps. These tabs secure the box structure. Make sure no essential artwork or text overlaps these glue zones.
Step 7: Visualize the Fold
Physically fold the flat dieline into a box. Or else, you can use 3D visualization software to ensure your graphics align correctly across every seam.
The Importance of the “Safe Zone” in a Dieline
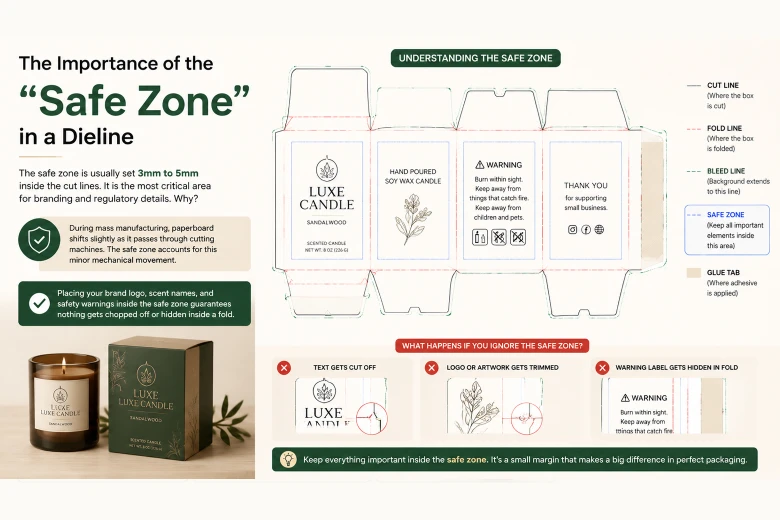
The safe zone is usually set 3mm to 5mm inside the cut lines. It is the most critical area for branding and regulatory details. Why?
During mass manufacturing, paperboard shifts slightly as it passes through cutting machines. The safe zone accounts for this minor mechanical movement. Placing your brand logo, scent names, and safety warnings inside the safe zone guarantees nothing gets chopped off or hidden inside a fold.
Bleed: Ensure Your Artwork Extends Beyond the Cut Line
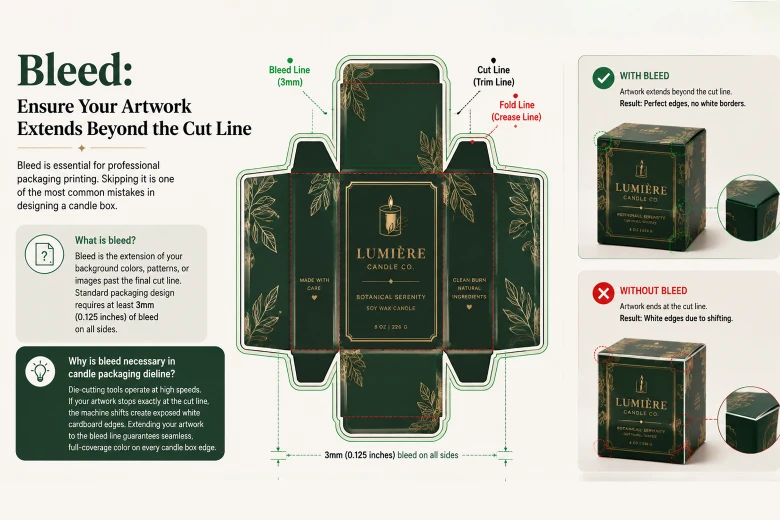
Bleed is essential for professional packaging printing. Skipping it is one of the most common mistakes in designing a candle box.
What is bleed?
Bleed is the extension of your background colors, patterns, or images past the final cut line. Standard packaging design requires at least 3mm (0.125 inches) of bleed on all sides.
Why is bleed necessary in candle packaging dieline?
Die-cutting tools operate at high speeds. If your artwork stops exactly at the cut line, the machine shifts create exposed white cardboard edges. Extending your artwork to the bleed line guarantees seamless, full-coverage color on every candle box edge.
Different Dieline Characteristics for Different Candle Boxes
Different box styles require unique structural dieline setups. Let’s have a look at the dieline characteristics of popular candle box styles.
| Candle Box Style | Dieline Characteristics | Key Considerations |
| Tuck Top Candle Box | Features top tuck flaps, dust flaps, side panels, and a glued side tab. | Ensure tuck flaps clear the top of jar lids without crushing wicks. |
| Lock Bottom Candle Box | Incorporates interlocking bottom flaps that snap together for support. | Excellent for supporting mid-weight glass candle jars securely. |
| Magnetic Closure Candle Box | Consists of separate inner tray and outer rigid jacket dielines with magnet pockets. | Requires precise board thickness calculations for a flush magnetic snap. |
| Hexagonal Candle Box | Six equal vertical panels connected with specialized top and bottom folding flaps. | Panels are narrower; keep text and logos centered within tight safe zones. |
| Two Piece Candle Box | Two different dielines: one for the top lid and one for the bottom base. | Calculating precise clearance tolerance is vital so the lid glides smoothly. |
| Display Candle Box | Features perforated tear-away sections or low front header panels. | Keeps warning labels visible on the base panel even when opened for display. |
Why Dielines Matter for Candle Packaging?
Candles present unique packaging challenges. They are heavy, fragile, and sensitive to temperature changes. An accurate dieline ensures both structural performance and visual appeal for candle packaging.
Here’s why dielines matter for candle packaging.
Ensuring Candle Protection & Weight Support
Glass jars and ceramic containers are heavy and can be very brittle, meaning they can break easily.
An accurate dieline has enabled us to create die-cut inserts custom-designed by structural engineers to hold the candle safely in place during packaging and transportation.
Preventing Labeling Distortion
Candle packaging labeling requires extensive regulatory text, including burn warnings and wax safety icons. Accurate dieline fold lines keep critical instructions legible and away from creases.
Incorporating Functional Features (Windows & Ventilation)
Many candle brands use custom cutouts or PET film windows. This allows shoppers to see wax colors or smell fragrance notes. The dieline marks exact window placement and film attachment zones.
Flawless Bleed for Luxury Aesthetics
Luxury candle boxes are typically produced with rich background colors and finish options like foil stamping and matte. The dieline for these boxes is typically set up to produce a very sharp cut along the lines of the design, creating a sharp border. All edges are to be fully printed, with no white unprinted areas.
Streamlining Manufacturing & Eliminating Waste
The “die” is made from your digital dieline file. This dieline must be set up correctly to avoid production delays, reprints, and excess material that would otherwise be wasted due to incorrect die-cutting.
In Summary
No doubt, a dieline for candle packaging is more than just lines on a page; it is the blueprint for your creative design to become the beautiful outer protective case for your luxury candles.
Understanding the different elements of a dieline file will enable you to avoid expensive mistakes and showcase your products in the best light.
Follow the steps above to read your candle box dieline, and you’ll get the best packaging that meets your expectations.
FAQs
What is a dieline?
A dieline is a flat (2D) technical template that shows all cut-outs, folds, creases, bleed, and safe areas of product packaging.
What are the main elements of a dieline for candle packaging?
The main elements of a dieline for candle packaging include the cut line, fold line, bleed line, safe zone, and glue tab.
Why is the safe zone important in a dieline?
The safe zone is the most critical area for branding and regulatory details. Placing your brand logo, scent names, and safety warnings inside the safe zone guarantees nothing gets chopped off or hidden inside a fold.
Why dielines matter for candle packaging?
An accurate dieline ensures both structural performance and visual appeal for candle packaging.



Get Free Quote
Latest Posts
-
 September 8, 2026
Cardboard Candle Boxes vs Kraft Candle Boxes: Complete Comparison -
 September 3, 2026
Rigid Candle Boxes vs Folding Cartons: Which Packaging Should You Choose? -
 September 1, 2026
Custom Candle Boxes vs Stock Candle Boxes: Which Is Better? -
 August 14, 2026
What is the Minimum Order Quantity for Candle Boxes? -
 August 12, 2026
How Long Does Custom Candle Box Production Take?